MAPPING OPERATIONAL TRANSACTIONS WITHIN ODOO
This document outlines the mapping of operational transactions to Odoo version 18.4, focusing on the Request for Quotation (RFQ), Purchase Order (PO), Billing, Warehouse Receiving, Returned Items, and Sales Order within the Odoo Modules. The goal of this documentation is to provide a comprehensive guide for users transitioning to Odoo, ensuring a clear understanding of how existing operational workflows are replicated and managed within the new system. By detailing each step of the processes, from initial setup to final execution, this guide aims to streamline the transition, minimize errors, and optimize the utilization of Odoo's Purchase Module.
I. REQUEST FOR QUOTATION PROCESS
The Request for Quotation (RFQ) process in Odoo streamlines procurement by enabling users to efficiently request and compare quotations from multiple vendors. The process begins with the creation of a Purchase Agreement Template, which serves as a pre-defined Bill of Materials (BOM). This template is then used to generate RFQs, automatically populating them with product details, quantities, and unit prices.
Key Steps in RFQ Process Includes
- Creating a Purchase Agreement Template: Define a reusable template containing the necessary BOM components.
- Generating the RFQ: Create a new RFQ and link it to the BOM, automatically populating details
- Sending RFQ: Dispatch RFQ to the selected vendor
- Managing Vendor Response: Modify any adjustment proposed by the vendor
- Call for Tender: Create alternative RFQs for multiple vendor
- Price Comparison and Selection: Evaluate quotations from different vendors and select the most favorable offer
- Finalizing RFQ: Remove any lines which is not part of purchase from the vendor
- Confirming RFQ: Confirmation of RFQ to initiate the Purchase Order Process
- Comment: Where is the uploaded BOM/BOQ located?
- Comment: Pls include a section for Project and tax type selection (VAT/Non-VAT)
- Use Fiscal Position
- Use Fiscal Position
- Comment: RFQ Sorting/Summary Per Project and Per Supplier
- Use Project Module
- Use Project Module
[Action]: Initiate a Purchase Template
This template serves as a blueprint, allowing users to easily link pre-defined Bill of Materials (BOM) to new RFQs.
Navigation: Purchase > Orders > Purchase Agreement > New
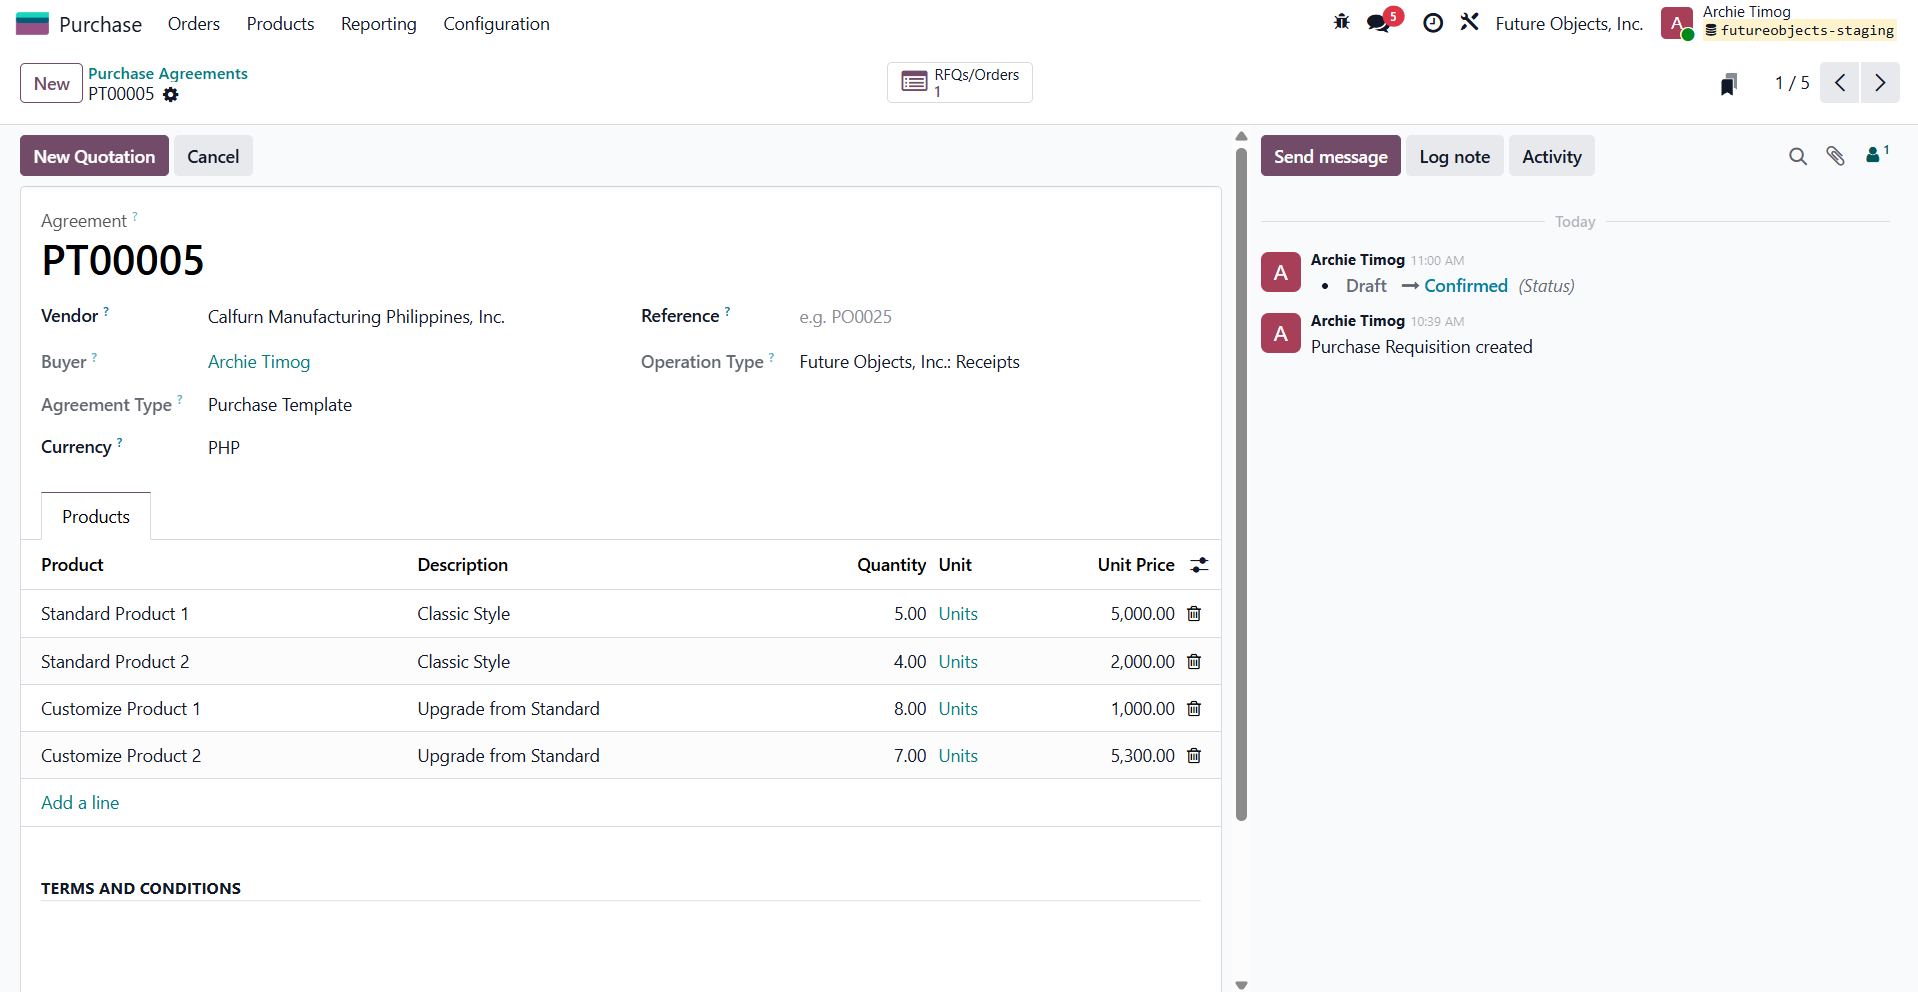
Upon finalizing the template, a request for quotation can be generated directly from the template, pre-populating the RFQ with the defined Bill of Materials and other relevant information.
[Action]: Request for Quotation
By utilizing the template, the RFQ is automatically populated with the necessary Bill of Materials (BOM) and vendor information, streamlining the procurement process.
Navigation: Purchase > New
- Comment: Can you include the Selection for Per Project:
- Use Project Module
- Use Project Module
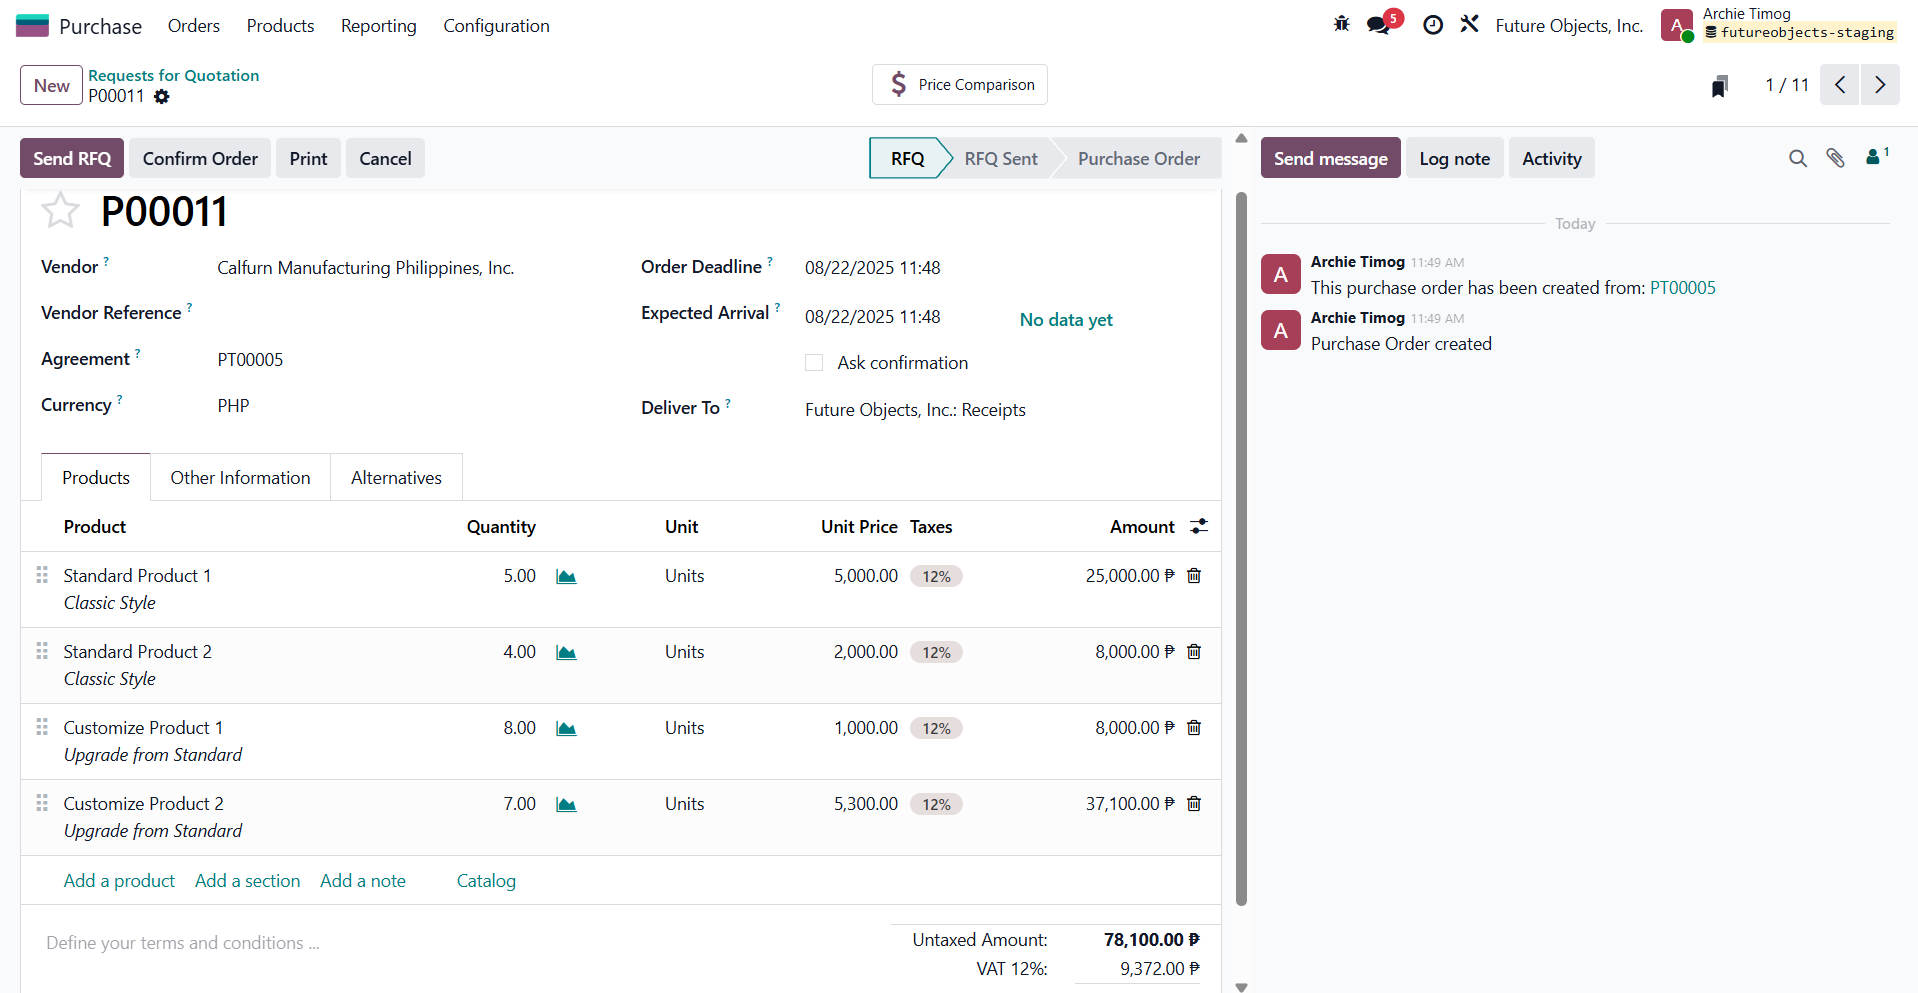
In the vendor field, select the same vendor that was specified in the Purchase Agreement Template. Select the BOM created in Step 1 in the Agreement field, which will automatically populate the RFQ based on the defined template. Subsequently, send the RFQ to the supplier by clicking the "Send RFQ" button, which will generate a pre-defined email template; upon sending the RFQ, the status will automatically update from "RFQ' to "RFQ Sent," indicating that the quotation request has been successfully dispatched to the vendor. If the supplier proposes any changes, such as price adjustment, modify the corresponding price directly on the RFQ within Odoo.
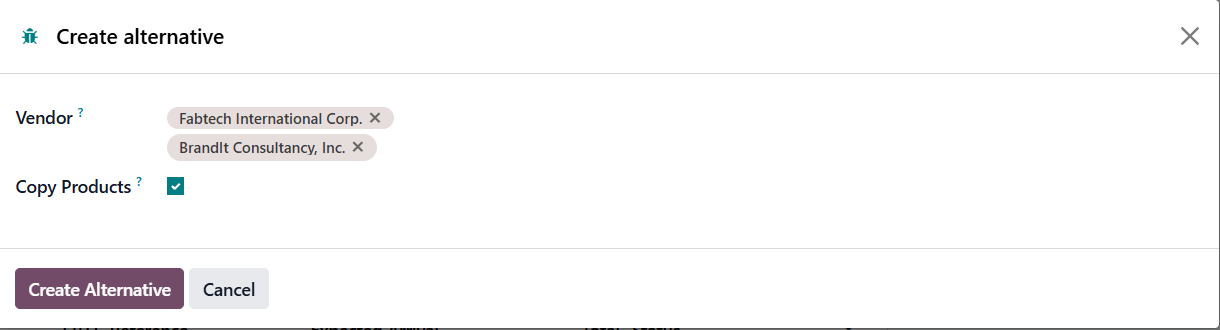
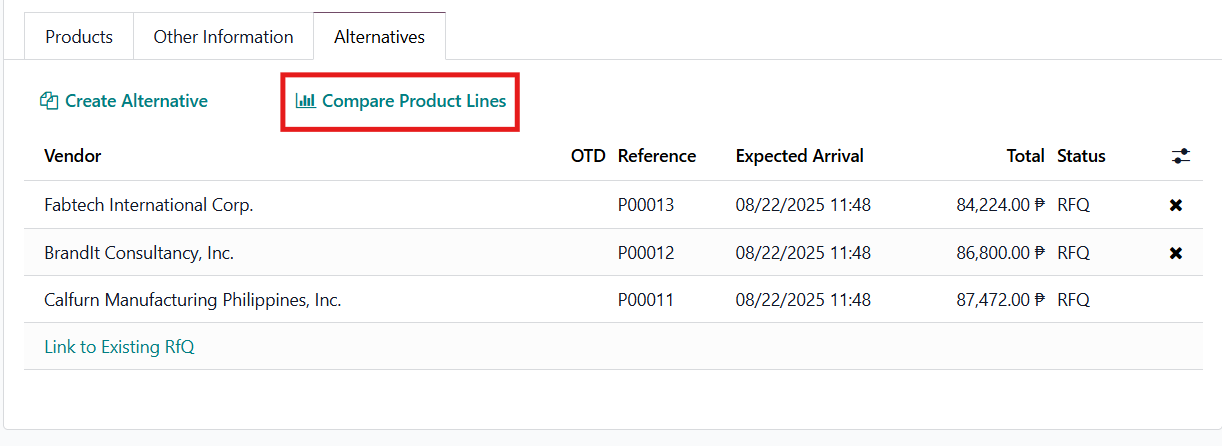
[Action]: Call for Tender
On the same RFQ, navigate to the Alternative Tab and choose the Create Alternative

A window will then appear, prompting the selection of a vendor for bidding; select the vendors and ensure that the "Copy Products" option is enabled. subsequently, an RFQ will be created specifically for the vendor specified in the "Alternative" section. Similarly, if a vendor makes any revisions to their quotation, modify the details directly within their respective RFQ.
Following the call for tender, all RFQs are interconnected, facilitating a comprehensive comparison; to determine the vendor offering the most advantageous terms, select the "Price Comparison" option, which will provide a consolidated overview of the submitted quotations.
This interface presents a comparative analysis of the quotations received from different vendors, enabling users to identify the most favorable offer, the system allows for the selection of the preferred option by clicking "Choose" and the removal of specific products by clicking "Clear."
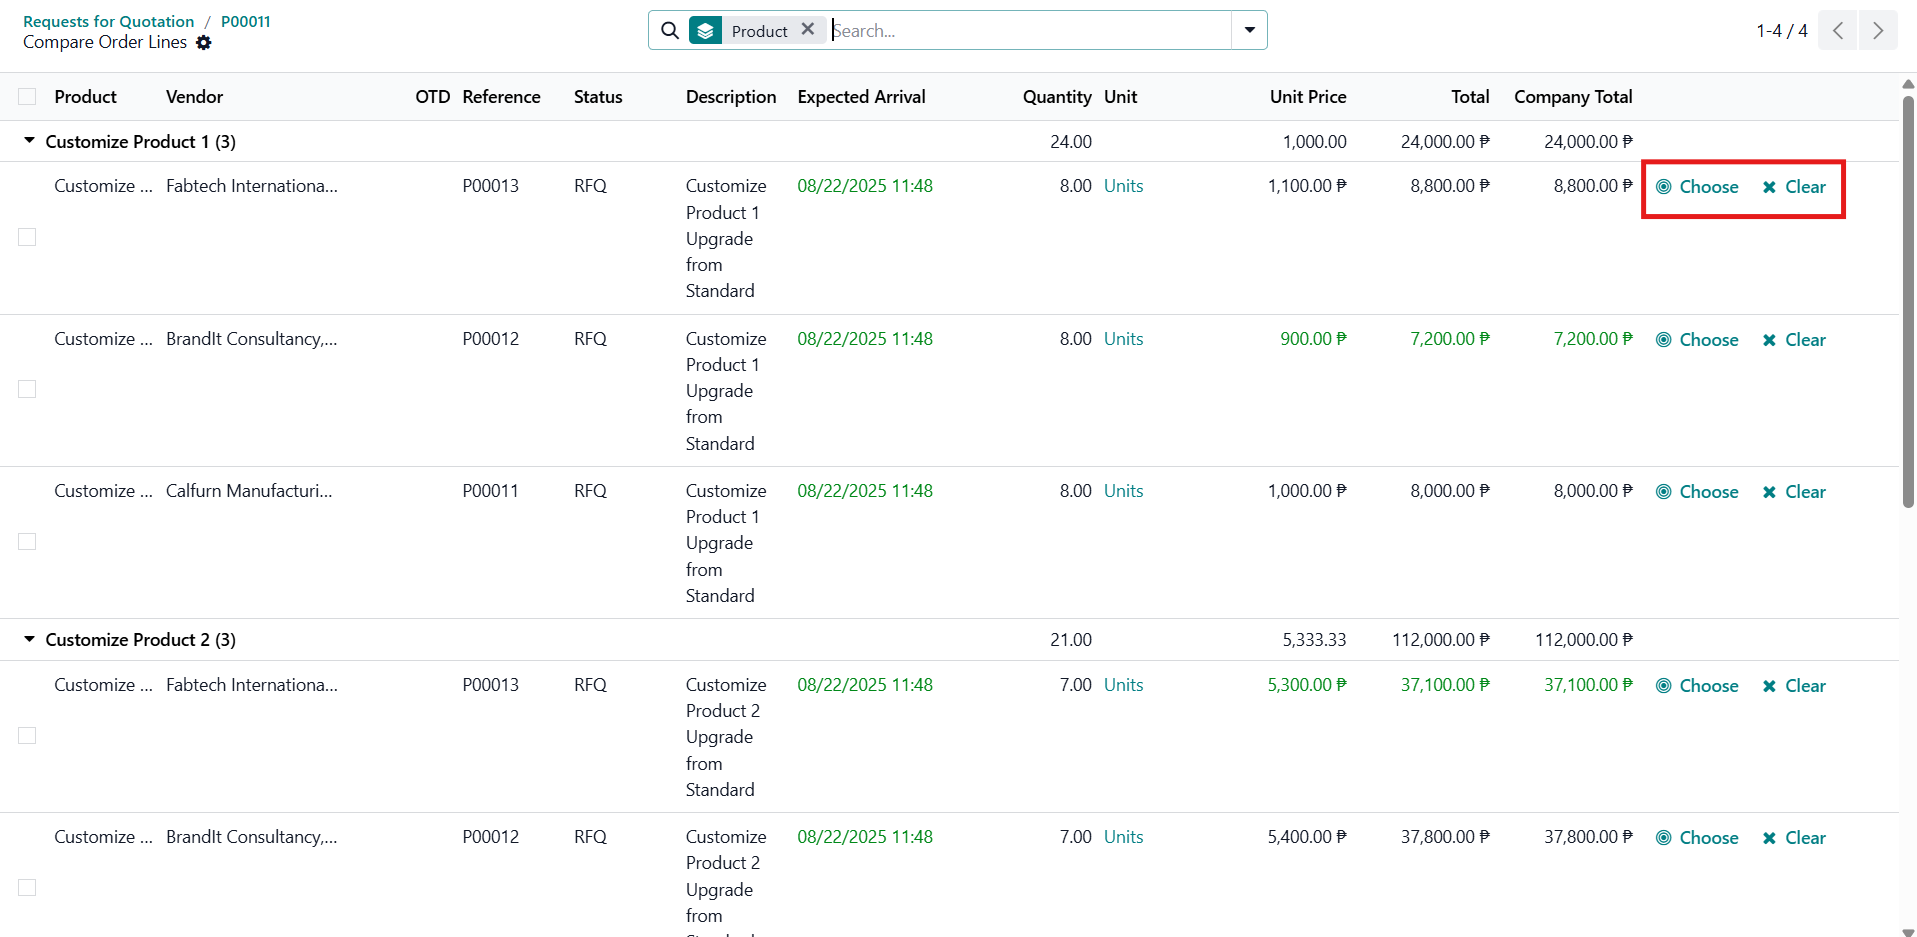
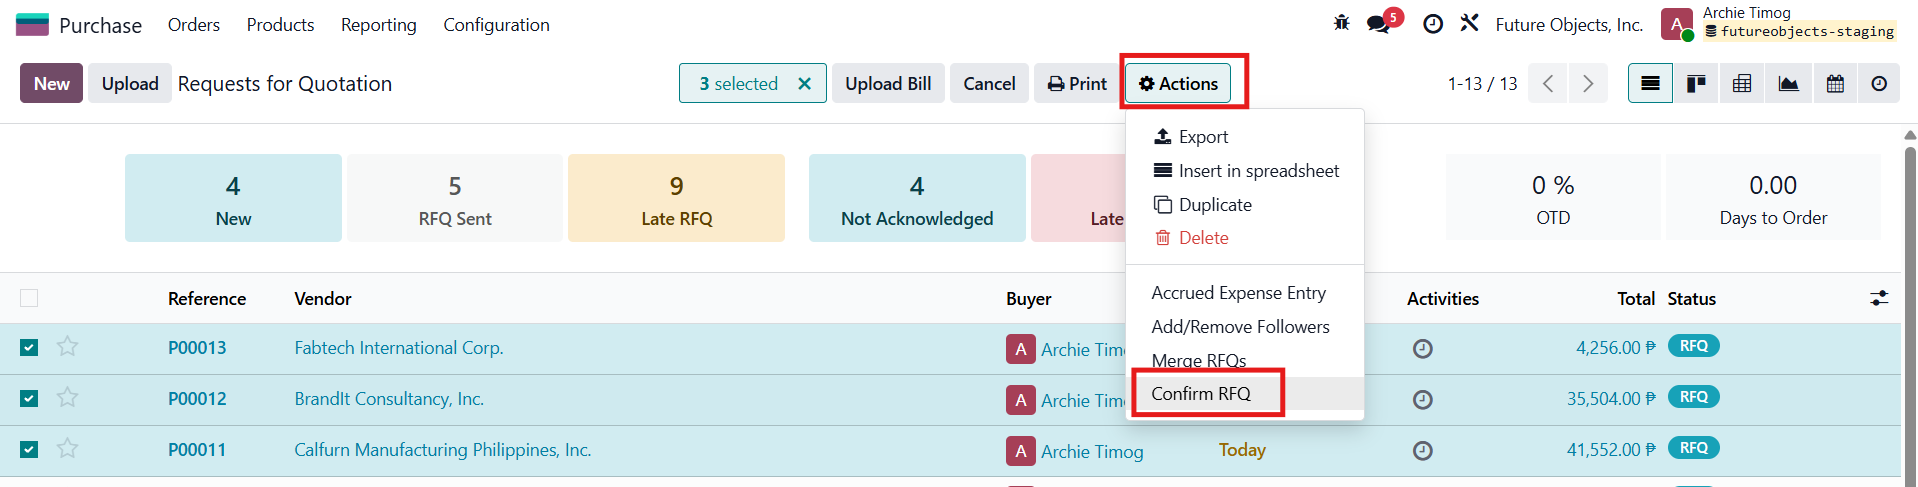
To finalize the RFQ, it is imperative to remove all line items displaying a quantity of zero, as these items will be procured from a different vendor based on the comparative analysis; retain only those items for which a quantity is specified. To expedite the confirmation process, select all relevant RFQs, then choose the "Action" button and select "Confirm RFQ", this action will simultaneously confirm all selected RFQ.
II. PURCHASE ORDERS PROCESS
After the RFQ is confirmed, the system automatically creates a Purchase Order from the agreed-upon terms. This changes the status from "RFQ Sent" to "Purchase Order," showing that the quote is now finalized and no longer a draft.
Important Reminders for Purchase Orders:
1. Verify all details: before sending the PO to supplier
* Vendor Information
* Product List
* Quantities
* Unit Prices
* Delivery Address
* Payment Terms / Terms and Conditions
- Comment: Where is the approval button? Approval and Lock.
- Add Approval Layers
- 1st: Accounting for Verification
- 2nd: Final Approval
- Comment: Pls include a section for Project and tax type selection (VAT/Non-VAT)
- Set to Mandatory to ensure it is filled
- Set to Mandatory to ensure it is filled
- Comment: Should be notified if the supplier is blacklisted.
- Warning Configuration was activated
- Add Warnings to each Vendor c/o FOI
- Warning Configuration was activated
- Comment: Where we can fine the PO Sorting/Summary Per Project.
- Project Module
- Project Module
2. Communicate clearly with the vendor: Ensure that vendor acknowledges receipt of PO and understand all terms and conditions. To send Purchase Order to supplier:
2.1 Look for the "Send PO' button. This is typically found at the top of the Purchase Order interface.
2.2 The Purchase Order is usually sent via email
3. Keep a record of all POs: Maintain a well-organize record of all purchase orders for tracking and auditing
Note: Once the PO is confirm, it cannot be edited. You have to unlock it to modify, however, only authorize users are allowed to unlock.
III. BILLING PROCESS
Odoo offers flexible billing processes to accommodate various business needs. Instead of a one-size-fits-all approach, Odoo supports several methods, including down payments, full payments, and progress billing.
- Down Payments: This method involves collecting a percentage or fixed amount upfront before services are fully rendered or goods are delivered. This secures the commitment and covers initial costs.
- Full Payment: The most straightforward approach, where the entire invoice amount is due at once, typically after delivering the product or completing the service.
- Progress Billing: Also known as milestone billing, this approach is ideal for long-term projects. Invoices are issued at predetermined stages or milestones of the project, aligning payments with the work completed. This ensures a steady cash flow and reduces the financial risk for both parties.
- Comment: Pls add the Final Billing
- Vendor Bill
- Vendor Bill
- Comment: Please include also the Project section in the template of billing form.
- Use Internal Reference in the Purchase Order
- Use Internal Reference in the Purchase Order
Odoo's integrated accounting features make managing these different billing methods seamless. You can easily create invoices, track payments, and reconcile accounts, all within the same platform. The system's automation capabilities reduce manual effort and minimize errors, leading to more efficient financial operations.
Note: To illustrate the different billing methods, we'll use Purchase Order PO0011 for a down payment example, PO0012 to demonstrate full payment, and PO0013 to showcase progress billing.
Down Payments
This part details the process of managing down payment billing within Odoo, a crucial aspect of financial transactions that ensures both the buyer's and seller's interests are protected. In Odoo, the down payment billing phase is seamlessly integrated with the Accounting module.
Key Steps in Down Payment Process:
- Creating a Vendor Bill: Establish a formal bill against a purchase, specifying the agreed-upon amount due.
- Finalizing Bill: Rigorously verify all critical details, including the amount, vendor identification, relevant references, and the accurate bill date, prior to confirmation.
- Registering Payment: Accurately record the payment transaction to ensure the integrity and accuracy of accounting records.
- Matching: Apply the down payment to the corresponding Purchase Order to properly reflect the financial status of the order.
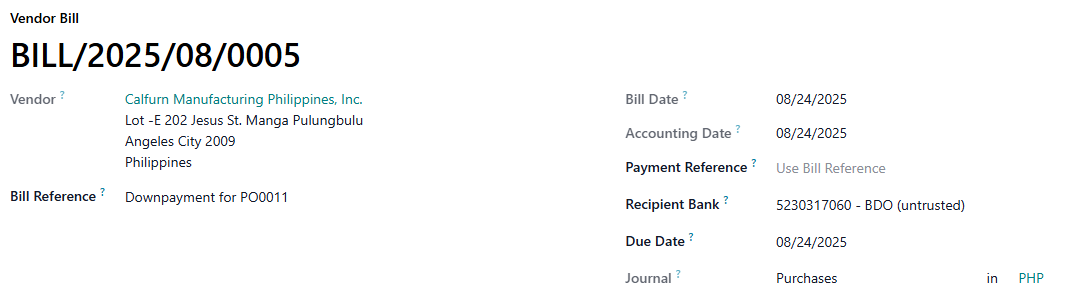
[Action]: Creating a Vendor Bill for the Down payment
This step involves creating a vendor bill in Odoo to reflect the down payment amount paid by the customer.
Navigation: Accounting > Vendors > Bills > New
Procedure:
- Navigate to Vendor Bills: From the Odoo main dashboard, navigate to the Accounting module. Under the "Vendors" menu, select "Bills."
- Create a New Bill: Click the "New" button to create a new vendor bill.
- Bill Configuration:
- Vendor: Select the vendor associated with the Purchase Order.
- Bill Date: Enter the date of the vendor bill.
- Due Date: Specify the payment due date, if applicable.
- Reference: Add a reference number for the bill (e.g., Down payment for PO0011).
- Comment : Please clear in this line if can include the vat section
- Set to Mandatory to ensure it is filled
- Set to Mandatory to ensure it is filled
- Add Bill Line:
- Product: Select or create a product to represent the down payment (if applicable, leave the product as blank if not)
- Description: Enter a description for the bill line (e.g., "Down payment for Purchase Order PO0011").
- Account: Choose the appropriate expense account for down payments (eg: Deposits, Advances to Suppliers).
- Quantity: Set the quantity to 1.
- Price: Enter the amount of the down payment.

- Save and Confirm: Save the vendor bill and then click the "Confirm" button.
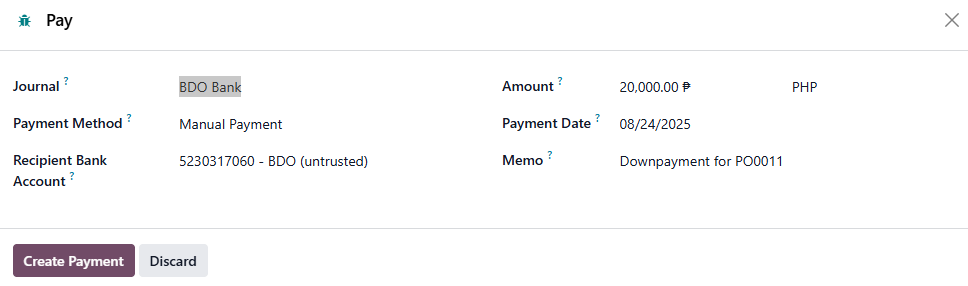
[Action]: Registering the Down payment
This step involves recording the payment made for the down payment to keep your accounting records accurate.
Navigation: Accounting > Vendors > Bills > [Select the Bill]
- Comment : Please include to the template billing voucher the Received By : Dated By:
- Use Stamp instead of customizing the Form
- Use Stamp instead of customizing the Form
Procedure:
- Access the Vendor Bill: Open the vendor bill you created in Step 1.
- Register Payment: Click the "Register Payment" button. This opens the payment registration window.
- Payment Details:
- Journal: Select the bank or cash journal from which the payment was made.
- Payment Method: Choose whether the payments has been made via manual or checks
- Amount: Verify that the amount matches the down payment amount.
- Payment Date: Enter the date the payment was made.
- Memo: Add a memo for reference (e.g., "Down payment for PO0011").
- Comment: Pls include a section for Project and tax type selection (VAT/Non-VAT)
- Use Project and Fiscal Position in Extra Info Column
- Comment: Pls include the breakdown of costs for budget allocation and spendable budget for each project.
[Action]: Matching of Down payment
This step involves linking the down payment bill to Purchase Order, ensuring that the payment made is correctly applied to the order.
Navigation: Accounting > Vendors > Bill > [Select the Bill]
Procedure:
- Access the Vendor Bill: Open the vendor bill created and paid
- PO Matching: On the smart button above, choose the purchase matching

- Bill Against PO: Select both the bill and PO Reference
- Add to PO: Apply the down payment by simply clicking the "Add to PO" and "Add Down Payment"

Full Payment
This document outlines the process of managing full payments within Odoo. This process is crucial for completing financial transactions, ensuring accurate accounting, and maintaining good vendor relationships.
[Action]: Creating a Vendor Bill for the Down payment
This step involves creating a vendor bill in Odoo to reflect the full payment amount paid by the customer.
Navigation: Accounting > Vendors > Bills > New
Procedure:
- Navigate to Vendor Bills: From the Odoo main dashboard, navigate to the Accounting module. Under the "Vendors" menu, select "Bills."
- Create a New Bill: Click the "New" button to create a new vendor bill.
- Bill Configuration:
- Vendor: Select the vendor associated with the Purchase Order.
- Bill Date: Enter the date of the vendor bill.
- Auto-Complete: Select the Purchase Order reference
- Register Payment: Please confirm the bill upon finalization. The payment registration process is consistent across all billing types, ensuring uniformity even for down payments and progress billings.

Progress Billing
This document outlines the process for progress billing, highlighting its similarities to down payment billing. The core steps remain consistent, ensuring a standardized approach across different billing scenarios. Progress billing is used when payment is made incrementally as work progresses towards completion. This contrasts with a single, final payment upon full completion. The following steps detail the process.
Procedure
The progress billing procedure mirrors that of down payment billing, ensuring a consistent and familiar workflow. The key steps are:
- Create a Progress-Based Bill: Generate a bill that accurately reflects the completed work or milestone achieved. This bill should include relevant details such as the percentage of work completed, associated costs, and any applicable taxes.
- Finalize the Bill: Once the bill is created, it must be finalized. This involves verifying all details, obtaining necessary approvals, and marking the bill as ready for payment.
- Register the Payment: Upon receiving payment, it must be officially registered in the system. This includes recording the payment date, amount, payment method, and any other relevant information. This step is identical to the payment registration process used for down payments.
- Apply the Bill to the Purchase Order: The finalized and paid bill must be applied to the corresponding purchase order. This ensures accurate tracking of expenditures and helps maintain a clear record of the project's financial status.
Note: This is an iterative process.. The above steps are repeated for each milestone or stage of progress. This iterative approach ensures that billing remains aligned with the project's advancement.
IV. RECEIVING PROCESS
Managing the receipt of products are crucial for maintaining accurate inventory levels, ensuring timely order fulfillment, and reconciling purchase orders with actual receipts. Odoo offers a 3-way matching that automatically reflected in the Purchase Orders. 3-way matching is at follows:
Ordered Quantity | The quantity of a product specified in the Purchase Order. This is the initial quantity requested to be delivered by the vendor. |
Received Quantity | The actual quantity of the product that were physically receive from the vendor. This quantity may differ from the ordered quantities due to some reasons, such as partial shipments or damages. |
Billed Quantity | The quantity of the product that the vendor invoices. Ideally, this should be matched to the received quantity if the bill policy is based on the delivered/received quantity. |
Odoo offers several flexible methods for receiving products, including the 'Receive' button, convenient smart buttons, and direct management through the Inventory module.
- Receive Button: This is located in the above the purchase order. Notice that the color of this button is in purple, indicating the this is the next step.

- Smart Button: It usually located in the upper right of the purchase order, the "Receipt" smart button.

- Inventory Module: The best practice of purchase receipt is by inventory module.
-

Note: The outcome is consistent across all receiving methods. For this discussion, we will explore the process of receiving products through the Inventory module.
[Action]: Accessing Receipts in the Inventory Module
The first step in the receiving process is to access the Receipts section within the Inventory Module.
Navigation: Inventory > Operations > Transfers > Receipts
Procedure:
- Navigate to Inventory: From the Odoo main dashboard, navigate to the Inventory Module.
- Go to Receipts: Under the "Operations" menu, select "Receipts." This will display a list of incoming shipments.
[Action}: Select Existing Receipts
You can either create a new receipt or select an existing one that is linked to a Purchase Order.
Procedure:
- Locate the PO: Select the related receipts that linked to a PO. Order reference is typically indicated in the source document field.
- Receiving Configuration:
- Receive From: A vendor of the Purchase Order
- Destination Location: A warehouse or location where the products are being delivered
- Source Document: Order reference
- Demand: The ordered quantities specified in the Purchase Order. Can not be edited.
- Quantity: The actual quantity received
- Receive From: A vendor of the Purchase Order
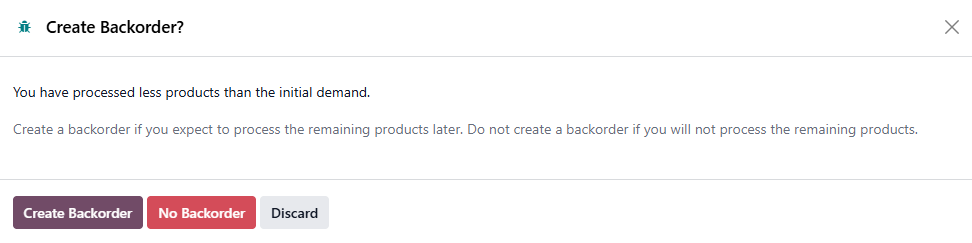
- Validate the Receipt: Inventory stocks on hand will automatically increase once the receipts is validated

- Backorders (if applicable): If you have not received the full quantity, Odoo will prompt a window to create a backorder or cancel the remaining quantity.
- Comment: Where we can find the Sorting of Receiving order per project?
- Inventory Movements in the Project Module Smart Button
- Inventory Movements in the Project Module Smart Button
V. RETURNED ITEMS
This document outlines the process for managing returned items in Odoo, initiating the return from the receipt. Properly handling returns is essential for maintaining accurate inventory, processing refunds or exchanges, and ensuring customer satisfaction.
[Action]: Accessing the Receipt
The first step in processing a return is to locate and access the relevant Receipt associated with the items being returned.
Navigation: Inventory > Operations > Receipts
Procedure:
- Navigate to Receipts: From the Odoo main dashboard, navigate to the Inventory module. Under the "Operations" menu, select "Receipts."
- Select the Receipt: Locate and open the specific Receipt for which you are processing a return. You may need to filter or search for the Receipt using the vendor name, order number, or product details.
[Action]: Initiating the Return Process
Once you have accessed the Receipt, the next step is to initiate the return process.
Procedure:
- Open the Receipt: Access the specific Receipt for which you are processing a return.
- Click "Return": Click the "Return" button, typically located at the top of the Receipt. This action will open a new window for creating a return.
[Action]: Specifying Return Details
In the return creation window, you will specify the details of the return, including the quantities being returned and the return location.
Procedure:
- Review Products: Review the list of products on the return form.
- Enter Return Quantities: In the "Quantity" column, enter the quantity of each product being returned.

- Return Location: Select the location where the returned items should be placed. This is typically a "Returns" location in your warehouse.
- Choose Return Type: Odoo offers different options for handling returns:

- "Return": This is the standard return option. It simply records the return of the specified quantity of the product to the selected return location.
- "Return All": This option automatically sets the "Done" quantity for all products on the Receipt to their original received quantities, effectively returning all items.
- "Return for Exchange": (Note: This functionality may require custom configuration or a specific module) This option is used when the customer is returning the items for an exchange. It typically involves creating a new Delivery Order for the replacement items.
- Validate the Return: Once you have entered all the return details, click the "Validate" button. This confirms the return and updates the inventory levels.
VI. SALES ORDER PROCESS
This document outlines the process of creating and managing Sales Orders in Odoo. The Sales Order process is the foundation of your sales operations, from initial customer requests to order fulfillment and invoicing. This guide provides a comprehensive walkthrough for creating, confirming, and managing Sales Orders in Odoo.
[Action]: Creating a New Sales Order
The first step is to create a new Sales Order in Odoo.
Navigation: Sales > Orders > Sales Orders > New
Procedure:
- Navigate to Sales Orders: From the Odoo main dashboard, navigate to the Sales module. Under the "Orders" menu, select "Sales Orders."
- Create a New Sales Order: Click the "New" button to create a new Sales Order.
[Action]: Configuring the Sales Order
In the Sales Order form, you will need to configure various details, including the customer, products, and quantities.
Procedure:
- Customer: Select the customer for whom you are creating the Sales Order. You can select an existing customer or create a new one.
- Quotation Template: Quotation template can be modified via Sales > Configuration > Quotation Template. It is the same process as the purchase template. Select a quotation template if applicable.
- Expiration: Set an expiration date for the quotation.
- Payment Terms: Select the payment terms for the order.
- Add Products:
- Click "Add a product" to add products to the Sales Order.
- Select the product from the list.
- Enter the quantity of the product.
- The unit price will be automatically populated based on the product configuration, but you can adjust it if needed.
- Shipping Address: Verify the shipping address. If it's different from the customer address, you can specify a different shipping address.
Subsequently, send the Sales Quotation to the client by clicking the "Send" button, which will generate a pre-defined email template; upon sending the quotation, the status will automatically update from "Quotation' to "Quotation Sent," indicating that the quotation request has been successfully dispatched to the client. If the customer proposes any changes, such as price adjustment, modify the corresponding price directly on the Quotation within Odoo.
[Action]: Confirming the Sales Order
Once you have configured all the details of the Sales Order, the next step is to confirm it.
Navigation: Sales > Orders > Sales Orders > [Select the Sales Order]
Procedure:
- Open the Sales Order: Access the specific Sales Order you want to confirm.
- Click "Confirm": Click the "Confirm" button. This action will:
- Change the status of the Sales Order from "Quotation Sent" to "Sales Order."

- Generate a Delivery Order (if the product is a storable product).
[Action]: Delivering Products (If Applicable)
If the Sales Order involves storable products, you will need to deliver the products to the customer.
Navigation: Inventory > Operations > Transfers > Delivery Orders
Procedure:
- Navigate to Delivery Orders: From the Odoo main dashboard, navigate to the Inventory module. Under the "Operations" menu, select "Delivery Orders."
- Select the Delivery Order: Locate and open the Delivery Order associated with the Sales Order. Reference is typically indicated in the Source Document field.
- Process Delivery:
- Quantity: The quantity of each product that you are delivering.
- Demand: Quantity specified in the sales order
- Product Availability: A status indicating whether the products are available or not available

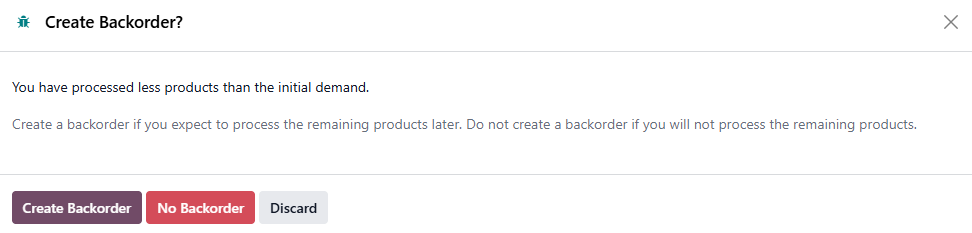
- Validate: Click "Validate" to confirm the delivery.
- Backorders: If you are not delivering the full quantity of a product, Odoo will prompt you to create a backorder.
Comment: The receiver's signature above printed name and date received must be included at the bottom of the Delivery Receipt (DR).
Use Stamp instead of customizing
[Action}: Creating an Invoice
After the Sales Order has been confirmed (and the products have been delivered, if applicable), the next step is to create an invoice.
Navigation: Sales > Orders > Sales Orders > [Select the Sales Order]
Procedure:
- Open the Sales Order: Access the specific Sales Order for which you want to create an invoice.
- Click "Create Invoice": Click the "Create Invoice" button.
- Invoice Type: Choose the invoice type:
- Regular Invoice: For the full amount of the order.
- Down Payment (percentage): For a percentage of the total amount.
- Down Payment (fixed amount): For a specific amount.
- Confirm Invoice: Review the invoice details and click "Confirm" to validate the invoice.
[Action}: Registering Payment
Once the customer has made the payment, you need to register the payment in Odoo.
Navigation: Accounting > Customers > Invoices > [Select the Invoice]
Procedure:
- Open the Invoice: Access the specific invoice for which you want to register the payment.
- Click "Register Payment": Click the "Register Payment" button.
- Payment Details:
- Journal: Select the bank or cash journal where the payment was received.
- Amount: Verify that the amount matches the invoice amount.
- Payment Date: Enter the date the payment was received.
- Validate Payment: Click the "Create Payment" button to validate the payment.
The consistent use of navigation paths and clear action steps across all modules promotes ease of understanding and minimizes the learning curve for new users. Furthermore, the emphasis on key concepts such as 3-way matching, different billing methods, and the handling of returned items highlights the importance of accuracy and attention to detail in maintaining reliable financial and inventory records.
By leveraging Odoo's integrated modules and adhering to the best practices described in this guide, organizations can optimize their operations, reduce errors, improve decision-making, and ultimately achieve greater success in their business endeavors. This documentation serves as a valuable resource for both new and experienced Odoo users, providing a solid foundation for effective and efficient utilization of the Odoo platform.
- Activate Margin Config to show Margin in the SO
- Vat and Non Vat Project Plan to segregate
- Automation Rule to notify the user once PO has been approved
- Purchase
- Accounting
- Management
- Sales Order
- Management
Comments:
Project Module
- project name
- project code
- added in the naming convention
- payment terms
- added as a Studio Field
Payment Terms
- added as a Studio Field
- start of project
- end of project
- non vat or vat
- added as a Studio Field
Fiscal Position
- added as a Studio Field
- Others
Addtl/Changes after soft go live
- Update Delivery Address to not show
- Choose
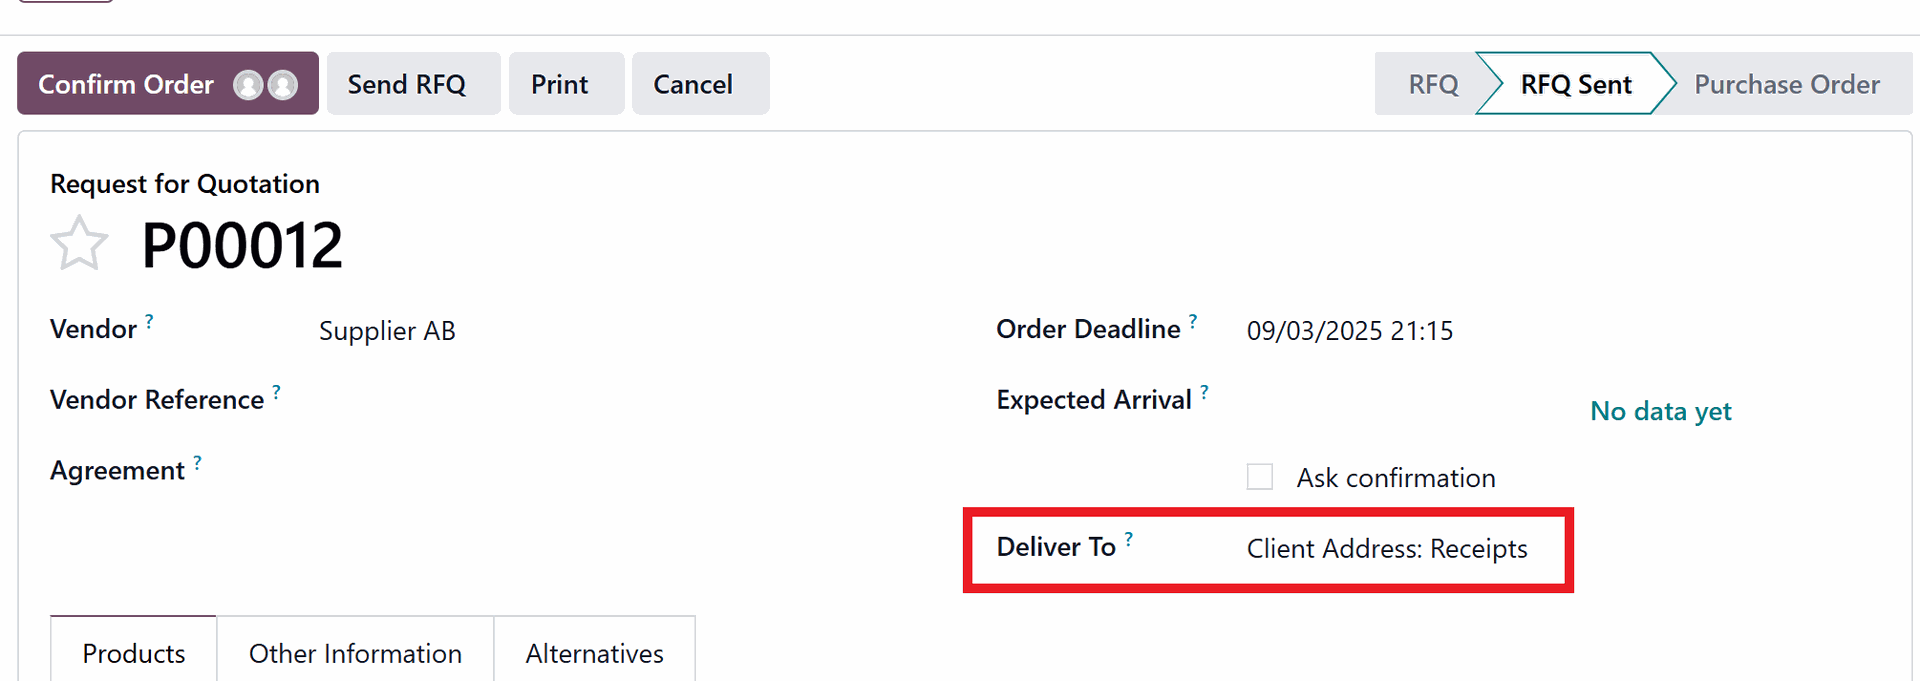
Client Address in theDeliver To field
- Choose
- Once RFQ Created, it says
PO Created - Also a standard design; Workflow stays the same anyway, so no need to change
- Change notif for RFQ Sent to just manual
Grant Approval Activity - Remove Barcode in the Return Slip
- The Barcode is not for the product but rather for the entire Return Slip; hence that is standard so no need to change that